


We often get requests from aspiring CG artists or 3D students asking us how they can use our 360° HDRIs and the technicals behind each HDRI map.
It got us thinking about that barrier that can be hard to pass as an enthusiastic CG artist that wants to progress from design and modelling to expressing their creativity as a photorealistic representation. The confusion and complexity of understanding 360 HDRIs is always the central question from aspiring artists, so we thought we’d do a little blog to remove the smoke and mirrors and offer a little insight into the world of 360° High Dynamic Range Images.

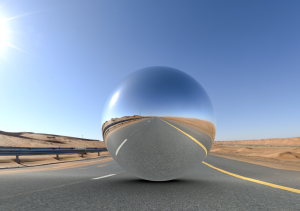
Creating realistic and accurate lighting in a 3D scene can be a challenge, but using a 360-degree high dynamic range image (HDRI) can be a powerful tool for achieving great results. A 360 HDRI captures the full range of lighting in an environment and can be used to light a 3D scene with accurate and realistic lighting. When it comes to 360 HDRi images, it’s recommended to use images with a 32-bit colour depth. The main reason for this is that 32-bit HDRi images can capture a wider range of brightness values than lower bit-depth images.
Traditional 8-bit images, for example, can only store 256 brightness values per colour channel, which can result in banding and loss of detail when used to light a 3D scene. In contrast, 32-bit HDRI images can store up to 16,777,216 brightness values per colour channel, which allows for much smoother and more accurate lighting.

In this blog post, we’ll cover the key factors to consider when using a 360 HDRI to light your 3D scene, including the importance of dynamic range, the location and orientation of the HDRI capture, the use of colour cards for colour balance, and more.
The Importance of Dynamic Range in a 360 HDRI
Dynamic range is a critical factor to consider when using a 360 HDRI to light a 3D scene. Dynamic range refers to the range of brightness values that an image can capture, from the darkest shadows to the brightest highlights.
A 360 HDRI with a high dynamic range can capture a wider range of brightness values, including subtle variations in lighting and shadow detail that might be missed with a lower dynamic range. When using an HDRI image to light a 3D scene, the dynamic range of the image can affect the accuracy of the lighting and the realism of the scene.
For CG artists, it’s essential to understand the dynamic range of the 360 HDRI you are using, and how it will impact the final result. While there is no one-size-fits-all approach to dynamic range, in general, a higher dynamic range is better, as it captures more information about the lighting environment.
It’s also worth noting that not all HDRI images are created equal. Some HDRIs may have a higher dynamic range, but also contain more noise or artefacts that could impact the final result. As a CG artist, it’s important to test different HDRIs and find the ones that work best for your particular project.
Location and Orientation of the HDRI Capture
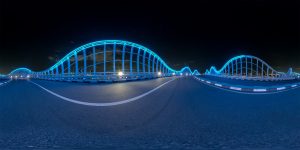
When capturing a 360 HDRI, the location and orientation of the camera can have a significant impact on the resulting image quality and lighting. To ensure that the lighting and reflections in your 360 HDRI match your 3D scene, it’s recommended to capture the HDRI in an environment that is similar to your scene.
For example, if you are creating a 3D rendering of an outdoor scene, you might capture the HDRI in a park or natural environment. Capturing the HDRI at a high resolution is also important to capture as much detail and lighting information as possible.
Using a tripod to stabilize the camera is crucial to ensure that the images are aligned and to minimize distortion. Capturing a full 360-degree image is important to create a complete lighting environment. This can be done by rotating the camera or by capturing multiple images and stitching them together.
One aspect that is often overlooked by CG artists is the importance of the orientation of the HDRI capture. The orientation of the camera can affect the distribution of lighting and the reflections in the image. For example, if you capture an HDRI with the camera pointing directly at the sun, it may result in overly bright or blown-out highlights, which could impact the final result.
To avoid this, it’s recommended to capture the HDRI at a time of day when the lighting is more evenly distributed, such as during sunrise or sunset. Additionally, capturing the HDRI at different exposures can help to capture the full range of brightness values in the scene.
The Height of the HDRI Capture Point
The height of the 360 HDRI capture point can also impact the final result of the lighting in a 3D scene. The height of the camera can affect the direction of the lighting and the shadows in the environment.
For example, if you capture an HDRI from a low angle, the resulting lighting may have more pronounced shadows and directional lighting. Conversely, if you capture the HDRI from a higher angle, the lighting may be more evenly distributed and less directional.
The height of the camera can also affect the reflections in the scene. For example, if you capture an HDRI from a higher angle, you may capture more of the sky or ceiling in the reflection, which could impact the colour and quality of the reflections.
When choosing the height of the HDRI capture point, it’s important to consider the specific requirements of your 3D scene. For example, if you are creating a 3D rendering of a room, you might capture the HDRI at a height that is representative of the viewer’s perspective.
Using a Colour Card for Colour Balance
Another key factor to consider when using a 360 HDRI to light a 3D scene is colour balance. Colour balance refers to the relative levels of different colours in an image, which can affect the overall colour temperature and appearance of the lighting.
One way to ensure accurate colour balance is to use a colour card in the HDRI capture. A colour card is a flat, neutral object that reflects light in a consistent way, making it easy to correct colour balance in post-processing.
By including a colour card in the HDRI capture, you can use it as a reference point to correct the colour balance of the image. This can be done using software such as Adobe Lightroom or Photoshop, which allows you to adjust the white balance and color temperature of the image to match the colour card.
Using the Right Software to Import and Adjust the HDRI
Once you have captured a 360 HDRI and are ready to use it to light your 3D scene, it’s important to use the right software to import and adjust the HDRI. Most 3D software packages support the use of HDRIs, and allow you to adjust the brightness, contrast, and other settings of the HDRI to achieve the desired lighting.
There are several software options for working with HDRIs such as Vred, Maya, 3ds Max, and Cinema 4D, Unreal engine and Unity, which all have built-in tools for working with HDRIs.
Conclusion
Using a 360 HDRI to light a 3D scene can be a powerful tool for achieving accurate and realistic lighting. By understanding the key factors that affect the quality and accuracy of the lighting, CG artists can create stunning 3D renders that look like they were shot in a real-world environment.
To get the best results, it’s important to consider the dynamic range of the HDRI, the location and orientation of the capture, the height of the capture point, and the use of colour cards for colour balance. Additionally, using the right software to import and adjust the HDRI can make the process much smoother and more efficient.
With these tips and best practices in mind, CG artists can take their 3D renders to the next level and create stunning, lifelike images that stand out from the crowd.
We have test sample packs at Domeble that will help your projects and your creative journey to understanding backplates and 360° HDRI’s and we’re always happy to help artists with access to these sample packs. Should you wish to get your hands on these, mail us here.
Written by Carl Lyttle- Founder at Domeble
[maxbutton id=”1″ ]